| Author |
Message |
newby

newbie
Joined: Sat Sep 06, 2014 12:00 pm Posts: 4
Vehicle: 1994 suzuki sierra sj70

|
 Posted: Mon Sep 08, 2014 12:12 pm |
|
|
Also am I just keeping the wiring harness that goes from computer to motor or is there more I need
|
|
|
|
|
ChrisN

Joined: Thu Nov 10, 2011 5:03 am Posts: 100 Location: Canberra
|
Posted: Mon Sep 08, 2014 4:53 pm |
|
|
I'd keep the lot until the project is complete and running. You never know what might come in handy!
|
|
|
|
|
zookfourby
newbie
Joined: Mon Sep 29, 2014 7:48 pm Posts: 1
Vehicle: 2009 Suzuki Jimny
|
Posted: Mon Sep 29, 2014 7:58 pm |
|
|
Hey, I was wondering whether anyone knows a good engine conversion for a 2009 Zook Jimny? Or something to enhance the Power in my engine?
Thanks
|
|
|
|
|
Gwagensteve

Joined: Thu Feb 26, 2009 10:30 pm Posts: 12997 Location: Melbourne
|
Posted: Tue Sep 30, 2014 4:53 pm |
|
|
|
|
aaronm1985
Joined: Wed Oct 24, 2012 6:22 pm Posts: 43
Vehicle: 1990 Suzuki Sierra Softtop
|
Posted: Sun Nov 30, 2014 1:46 pm |
|
|
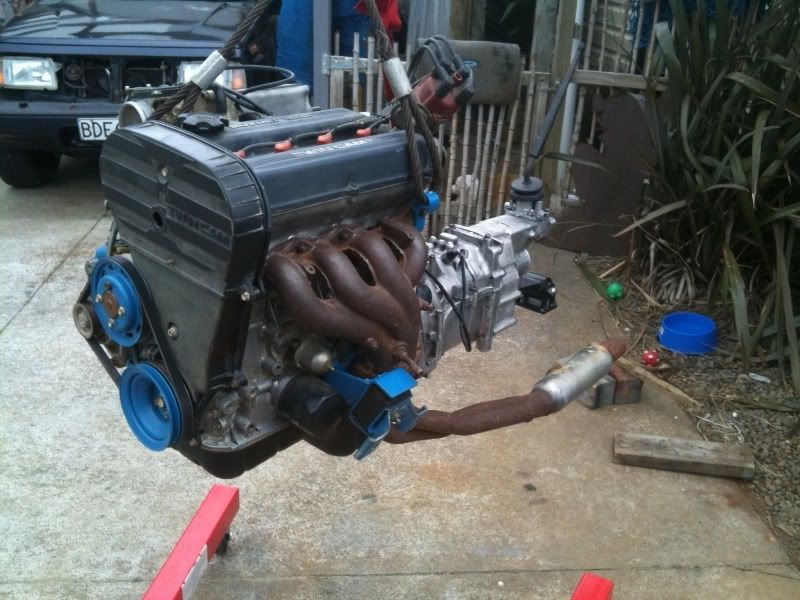
G'day ladies and gents, I am in the process of doing the swift Gti conversion and I am having trouble lining the passenger side engine mount up. I am wondering if the part of the mount bolted to the engine block is wrong as I have got the gearbox mounted up and in right position and the drivers side sits in position. If anyone has done the conversion can give me a hand it would be great and if possible show me some photos. Also the front of the motor seems to sit really high. I don't have any of the photo uploading sites and not 100% sure how to add photos, I am in the facebook group zookersrus4x4 which has photos. I have gotten all of the above mentioned items to do this and still havin issues.
|
|
|
|
|
whincup
az supporter


Joined: Sat Apr 17, 2010 11:30 pm Posts: 1588 Location: Gracemere, QLD
Vehicle: '94 suzuki maruti
|
Posted: Sun Nov 30, 2014 2:49 pm |
|
|
have you bashed in the firewall yet? i had trouble with mine, except it was drivers side mount... distributer cap was hitting firewall: more bashing. and yes, the front of the engine appears to be really high and whilst fitting i had concerns as to whether the bonnet would close but had plenty of space in the end.
|
|
|
|
|
aaronm1985
Joined: Wed Oct 24, 2012 6:22 pm Posts: 43
Vehicle: 1990 Suzuki Sierra Softtop
|
Posted: Sun Nov 30, 2014 4:51 pm |
|
|
Yeah mate I have bashed the fire wall and I have the right angle drive kit and also the mk3 thermostat housing with the pipe running to the passenger side. So I still at a stand still. My friend who is helping me is think of making a new plate thing that bolts to the chassis and the engine mount to suit in 4mm solid steel to take some pressure of the mounts.
|
|
|
|
|
UBZ
Joined: Sun Nov 16, 2008 10:30 pm Posts: 296 Location: NZ
Vehicle: LJ50 , LJ80Q-II
|
Posted: Sun Nov 30, 2014 7:23 pm |
|
 have you got the mounting plates between the engine mounts and chassis facing the right direction? If they angle upwards they wont line up . Also did you remove the factory intake manifold brace before bolting on the Seirra engine mounting brackets to the block? I also found I needed to have the rubber engine mount bolts loose until the engine was in place .
|
|
|
|
|
aaronm1985
Joined: Wed Oct 24, 2012 6:22 pm Posts: 43
Vehicle: 1990 Suzuki Sierra Softtop
|
Posted: Mon Dec 01, 2014 6:40 am |
|
|
Hey UBZ, the plate of steel in between the chassis and the mount was twisted around a few times while the engine was in and only made a difference of 2 to 4 mm.
As for the intake manifold, it was still on as I bought the engine as is, as it was already in a sierra. I did try and put the engine in when I first received it and had issues due to the the dissy and thermostat housing. I have since followed this write up basically to a tee for a mk1 engine (the one I got). The exhaust manifold is off as I am going to buy a new one from max headers or the guy on ebay.
as it sits now the engine is pretty straight with the drivers side mount and gear box mount are in perfect. My friend and I are thinking of modifying that steel plate to suit by welding up the hole and adding another 3mm plate in behind, the re-drilling the hole 10mm offset.
|
|
|
|
|
whincup
az supporter
Joined: Sat Apr 17, 2010 11:30 pm Posts: 1588 Location: Gracemere, QLD
Vehicle: '94 suzuki maruti
|
Posted: Fri Dec 05, 2014 11:27 pm |
|
|
what model is it going into? was it originally a 1.3L sierra?
|
|
|
|
|
aaronm1985
Joined: Wed Oct 24, 2012 6:22 pm Posts: 43
Vehicle: 1990 Suzuki Sierra Softtop
|
Posted: Sat Dec 06, 2014 9:18 am |
|
|
1990 wt. It had a G13BA in it originally
|
|
|
|
|
zook83
Joined: Thu Jun 02, 2011 2:28 am Posts: 157 Location: brisbane
|
Posted: Sun Feb 22, 2015 6:18 pm |
|
|
where abouts do we buy the barina thermostat housing and what model is it cheers
|
|
|
|
|
whincup
az supporter
Joined: Sat Apr 17, 2010 11:30 pm Posts: 1588 Location: Gracemere, QLD
Vehicle: '94 suzuki maruti
|
Posted: Sun Feb 22, 2015 7:38 pm |
|
|
take the part number thats in the first post straight into your local suzuki dealers parts desk. genuine suzuki, relatively cheap. part number is all they need to know.
|
|
|
|
|
rwt65

Joined: Tue Aug 16, 2011 1:45 am Posts: 327
Vehicle: Tin Top
|
Posted: Tue Feb 24, 2015 12:09 pm |
|
whincup wrote: have you bashed in the firewall yet? i had trouble with mine, except it was drivers side mount... distributer cap was hitting firewall: more bashing. and yes, the front of the engine appears to be really high and whilst fitting i had concerns as to whether the bonnet would close but had plenty of space in the end. aaronm1985 wrote: Yeah mate I have bashed the fire wall and I have the right angle drive kit and also the mk3 thermostat housing with the pipe running to the passenger side. So I still at a stand still. My friend who is helping me is think of making a new plate thing that bolts to the chassis and the engine mount to suit in 4mm solid steel to take some pressure of the mounts. Why are you bashing the firewall?  If you place a 1' spacer under your gearbox rear mount it will tilt/move your Dizzy off the firewall, no hammering needed. I had the same problem with my Mk3 conversion. I had raised transfer mounts, so I raised the rear gearbox mount and it moved the engine forward off the firewall, has clearance everywhere like this I run VL engine mounts on both sides no problem, should just be a straight bolt up 
|
|
|
|
|
whincup
az supporter
Joined: Sat Apr 17, 2010 11:30 pm Posts: 1588 Location: Gracemere, QLD
Vehicle: '94 suzuki maruti
|
Posted: Tue Feb 24, 2015 8:46 pm |
|
rwt65 wrote: Why are you bashing the firewall? could be because mines a maruti and was originally a 1L, but i had a lot of trouble getting enough space, and did consider lifting the back of the box but decided against it due to not wanting to mess with uni angles (my transfers not lifted) so i moved the whole engine/box forward 10mm instead, and this still barely gave me enough room with the massaged firewall. either way firewall absolutely needed bashing in in my case, there was no way around it.
|
|
|
|
|
whincup
az supporter
Joined: Sat Apr 17, 2010 11:30 pm Posts: 1588 Location: Gracemere, QLD
Vehicle: '94 suzuki maruti
|
Posted: Wed Mar 04, 2015 9:28 pm |
|
|
anyone done this conversion and fitted PS and AC? my BenT kit is useless for this, as the PS bracket wont fit due to the timing cover... plus id like to fit AC at some point...
|
|
|
|
|
suzooky
Joined: Thu Oct 09, 2014 8:55 pm Posts: 16
Vehicle: suzuki sierra 1996
|
Posted: Mon Apr 20, 2015 9:26 pm |
|
|
Hey guys been looking for a few weeks now.
Need a mk1 pinout and schematic but can only ever find mk2/3 and can only buy them too. No mk1's. And all links i click have failed or been removed.
My whole car is finished but harness i got is shit and need to rewire just need sxhematic. Or a few pointers.
|
|
|
|
|
UBZ
Joined: Sun Nov 16, 2008 10:30 pm Posts: 296 Location: NZ
Vehicle: LJ50 , LJ80Q-II
|
Posted: Tue Apr 21, 2015 7:41 am |
|
|
This is the ECU Pinout .
I have the Schematic somewhere , I will have a look on the hard drive tonight for ya
There are three couplers - a 24 pin, 18 pin and 10 pin.
The 24 pin one is labelled like this
B D F H J L N P R T V X
A C E G I J K M O S U W
A-power
B-earth
C-power
D-earth
E-power source for air flow sensor
F-power source for back up circuit
G-power source for throttle sensor
H-earth for sensors
I-earth for air flow sensor
J-electric load switch
K-air flow sensor
L-blank
M-water tem sensor
N-blank
O-oxygen sensor (if equipped)
P-blank
Q-throttle sensor
R-idle switch of throttle sensor
S-blank
T-diagnosis start switch (coulper)
U-blank
V-earth for selection
W-ignition pulse
X-blank
The 18 pin couple is labelled like this
2B 2D 2F 2H 2J 2L 2N 2P 2R
2A 2C 2E 2G 2I 2K 2M 2O 2Q
2A-selection
2B-selection
2C-check engine lamp
2D-blank
2E-VSV for idle up
2F-selection
2G-blank
2H-power source for fuel pump relay
2I-TWSV for ignition advance
2J-TWSV for EGR valve (if equipped)
2K,2L,2M-blank
2N-earth
2O-power source for main relay
2P-earth for injector
2Q-power source for injector
2R-earth for injector
The 10 pin coupler is labelled like this
3B 3D 3F 3H 3J
3A 3C 3E 3G 3I
3A-engine start switch
3B-power source for injector
3C-1 injector +
3D-1 injector -
3E-2 injector +
3F-2 injector-
3G-3 injector +
3H-3 injector-
3I-4 injector +
3J-4 injector -
|
|
|
|
|
Samurai81

Joined: Fri Nov 06, 2009 10:30 pm Posts: 385 Location: Kapiti Coast, New Zealand
Vehicle: Samurai G16, DMax.
|
Posted: Fri Apr 24, 2015 5:01 am |
|
|
Hey Chris,
You still want that LJ stuff I salvaged at Christmas?
Steve.
|
|
|
|
|
Heideisadog
az supporter

Joined: Fri Jun 21, 2013 1:27 pm Posts: 403 Location: Canberra, ACT
Vehicle: 1996 Leaf Sierra - Soft Top
|
Posted: Wed Jun 17, 2015 1:32 pm |
|
|
Hey guys, just one question. Everything is done for this conversion except the accelerator cable.
When you say early model Mazda 323 cable, what years is that? Or what other options have people used?
I have installed an MK3 GTI into my Sierra, can not wait to take it out!
Thanks for the help!
|
|
|
|
|
UBZ
Joined: Sun Nov 16, 2008 10:30 pm Posts: 296 Location: NZ
Vehicle: LJ50 , LJ80Q-II
|
Posted: Wed Jun 17, 2015 9:42 pm |
|
|
I'm not entirely sure what model 323 the cable I used came from . We went to the wreckers and just looked for a cable with both the right ends . and roughly the right length.
I would say it is a 4th or 5th Generation 323 ie 1980-1984 or 1985-1989
|
|
|
|
|
Heideisadog
az supporter
Joined: Fri Jun 21, 2013 1:27 pm Posts: 403 Location: Canberra, ACT
Vehicle: 1996 Leaf Sierra - Soft Top
|
Posted: Thu Jun 18, 2015 8:42 pm |
|
|
Super! Thanks for that I'll have a look around!
|
|
|
|
|
whincup
az supporter
Joined: Sat Apr 17, 2010 11:30 pm Posts: 1588 Location: Gracemere, QLD
Vehicle: '94 suzuki maruti
|
Posted: Sun Jun 21, 2015 7:04 am |
|
|
i had my standard sierra cable lengthened. cost about $30.
|
|
|
|
|
Heideisadog
az supporter
Joined: Fri Jun 21, 2013 1:27 pm Posts: 403 Location: Canberra, ACT
Vehicle: 1996 Leaf Sierra - Soft Top
|
Posted: Tue Jun 23, 2015 4:35 pm |
|
whincup wrote: i had my standard sierra cable lengthened. cost about $30. Where did you get that done? Or what type of place does that?
|
|
|
|
|
ChrisN
Joined: Thu Nov 10, 2011 5:03 am Posts: 100 Location: Canberra
|
Posted: Tue Jun 23, 2015 8:59 pm |
|
|
I used the cable end fitting from the standard engine along with a long universal cable (ebay). I straightened out the bent tube to fit, cut the universal cable to a generous length to allow it to be routed without tight bends, reinforced the join with crimped aluminium tube and plenty of heat-shrink. I did have to solder the fittings to the end of the cable (brazing probably better). Not too hard to work out once you sit down with the bits and pieces. Send me a PM if you want to look at mine.
|
|
|
|
|
whincup
az supporter
Joined: Sat Apr 17, 2010 11:30 pm Posts: 1588 Location: Gracemere, QLD
Vehicle: '94 suzuki maruti
|
Posted: Tue Jun 23, 2015 10:17 pm |
|
Heideisadog wrote: Where did you get that done? Or what type of place does that? this is the mob that did it for me. just took in my old cable and told them how much to add on. http://alliedpartsrockhampton.com.au/
|
|
|
|
|
Heideisadog
az supporter
Joined: Fri Jun 21, 2013 1:27 pm Posts: 403 Location: Canberra, ACT
Vehicle: 1996 Leaf Sierra - Soft Top
|
Posted: Tue Jun 23, 2015 10:19 pm |
|
|
Thanks for that Chris! I will shoot you a PM tomorrow, would definitely love to have a look if possible!
|
|
|
|
|
raees1156
newbie
Joined: Tue Oct 13, 2015 7:44 pm Posts: 1
Vehicle: suzuki9
|
Posted: Tue Oct 13, 2015 7:46 pm |
|
not it is a big deal you can find easily all spare parts now available for the Sierra and no doubt there are many options for you to customize Suzuki Cultus For Sale
|
|
|
|
|
Heideisadog
az supporter
Joined: Fri Jun 21, 2013 1:27 pm Posts: 403 Location: Canberra, ACT
Vehicle: 1996 Leaf Sierra - Soft Top
|
Posted: Mon Oct 19, 2015 7:16 am |
|
|
just finishing the last few bits on my conversion, should be able to start the zook this week!
But, what do I do with the charcoal canister? Do I just remove it and plug up the line to the tank, or does it connect somewhere to the new engine?
Thanks for any help
|
|
|
|
|
DMAC
az supporter

Joined: Thu Jan 29, 2009 10:30 pm Posts: 1612 Location: North Brisbane
|
Posted: Tue Oct 20, 2015 7:26 pm |
|
|
I put a small fuel filter on the end and left it vented to atmosphere.
_________________
SS
|
|
|
|
|
|


