| Author |
Message |
honour


Joined: Mon Oct 14, 2013 7:21 pm Posts: 239
Vehicle: 2002 Jimny

|
 Posted: Mon May 26, 2014 5:21 pm |
|
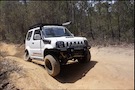
Hey all! I have just finished trimming my Jimny front arches to make way for new tyres, and thought I would post up the process and results. I started with the BigJimny guide, however I found this was pretty undetailed, so wanted to put up some photos to hopefully help anyone else looking to do the same. Also, the main requirements for me were of course to allow for bigger tyres, but also retain the splashguards inside (don't want my door jambs filling up with mud), and also to provide mounting for flares to cover the extra width of the new tyres. Please keep in mind, this is just a guide on what I did - it may not necessarily be suitable for you car. Anyway, here goes - Step 1. Admire the flares in factory form and begin to wonder if this is going to end terribly.  Step 2. Remove the plastic flare. There are about 6 clips from memory, they all pop out easily with a little tug. As well as the few in the wheel arch.  Step 3. Trim the flat spot of the plastic arch, this is around an inch all the way around. Notice that this will remove all of the mounting tabs inside for the splashguard etc. This will be rectified later - don't worry.  Step 4. Reattach the flare. the steel will now be hanging out below the plastic line.  Step 5. Remove the inner splashguard.  Step 6. Trace a line onto the steel, indicating the line of the plastic.  Step 7. The BigJimny guide removes all of this steel, but I want to retain it for the splashguards and to create a flat surface for mounting flares. So rather than cutting it all out, slice into the steel into 'teeth' like sections. Slice up to the line you have drawn, and a couple of millimetres more, to allow for bending.  Step 8. Bend the steel teeth up the create a relatively flat surface to mount your flare. There is already a 90 degree rim in the steel behind these teeth, which will help to hold the splashguard in place.   Step 9. The splashguard needs to be refitted, however there are some sections which will need to be removed in order to get it to fit. This can be pretty roughly done, as it will all be hidden away anyway. I removed the flat part which would normally sit behind the plastic removed, as well as the front section as it will now have no where to mount and will just flap around.  Step 10. Trim the front bumper to suit.  Step 11. Refit the splashguard. The existing plastic clips inside the arch will hold it nicely, and tucking the outer side behind the newly folded steel, it should hold in super tight.  Step 12. Be sure to spray the newly cut steel to prevent rust.  Step 13. Wanting to create as neat a finish as possible, I lined the new cut edges with pinchweld from Clark Rubber. (Their item #19907 - about $6.95/m)   Step 14. Next up was the flares. Yep - I went for garden edging. $25 for a 10m, 75mm wide roll from Bunnings. Cut a section roughly the length you will need to fill the arch.  Step 15. Mark a line on the flare marking how far you want it to stick out. I used painters tape.  Step 16. Mount the flare to the (relatively) flat steel area just created in the arch. I just used rivets. Very solid.    Step 17. Tidy up. There are a couple of little details to fix up. For example, on the very bottom edge, there is nothing to rivet to, so I drilled a small hole through the bottom of the flare and the base of the original plastics and cable tied them together to prevent any of the new flare moving around. (This picture shows it before the cable tie - in the very bottom left of the arch. Also the front of the original plastic flare, and the front bumper, now sit quite loose around this area as there are no mounting points anymore. I again drilled a small hole behind the visible face, and cable tied them together. Only just visible when looking up close.  There may also be a bit more trimming / styling of the flare that you may want to do (I am still yet to finish that element). Step 18. Done!  Anyway, I hope that helps someone! If anyone has any questions, let me know. Cheers. Scott.
Last edited by honour on Sun Jul 20, 2014 1:27 am, edited 3 times in total.
|
|
|
|
|
zukenutter
az supporter


Joined: Sun Feb 08, 2009 10:30 pm Posts: 9045 Location: Brisneyland
Vehicle: 2006 Jimny JLX
|
Posted: Mon May 26, 2014 5:33 pm |
|
|
Awesome Scott, That's the tidiest "BigJimny guard chop" I've seen. Actually I think it should be renamed the "AusZookers guard chop".
Great effort.
One thing I would have done different is run the pinchweld across the gap between guard and bumper to add rigidity between the two parts.
_________________
Click WWW below for STICKERS
|
|
|
|
|
pete_79

Joined: Wed Feb 06, 2013 8:24 pm Posts: 1571
Vehicle: 91 Tin Top
|
Posted: Mon May 26, 2014 5:46 pm |
|
|
Brilliant!!!
Tidiest AND most detailed.
The extra flares covering the folded flaps on the panel is a nice touch. Great work mate.
|
|
|
|
|
honour
Joined: Mon Oct 14, 2013 7:21 pm Posts: 239
Vehicle: 2002 Jimny
|
Posted: Mon May 26, 2014 6:17 pm |
|
|
Cheers guys!
Yeh that was originally the plan ZN, and it looked good. But I was a little worried about hitting the bumper and thus pulling on the flares. I have a bit of the pinchweld left over though, so may do that later.
Thanks again guys. And yeh - the AusZookers chop sounds good. Haha.
|
|
|
|
|
Jezza86
Platinum Supporter

Joined: Tue Dec 06, 2011 9:30 am Posts: 2155 Location: Nhulunbuy 0880
Vehicle: 2010 jimny
|
Posted: Mon May 26, 2014 6:26 pm |
|
|
good tech, and I second the AZ guardchop.
step 18, go drive it!!!
Great work Scott. now i can take out my bodylift!!!
|
|
|
|
|
Marko_SJ
Joined: Tue Jan 17, 2012 1:40 am Posts: 2979 Location: Darwin, NT
Vehicle: WT sierra, GU CRD
|
Posted: Mon May 26, 2014 6:38 pm |
|
|
Good work, we'll have to do this to my brother's.
_________________
I love ZD30. :)
|
|
|
|
|
cal213
Joined: Fri Oct 12, 2012 9:01 pm Posts: 308 Location: traralgon vic
Vehicle: jimny g13bb, 99 wrx!
|
Posted: Mon May 26, 2014 7:42 pm |
|
|
What size tyres are they?
|
|
|
|
|
honour
Joined: Mon Oct 14, 2013 7:21 pm Posts: 239
Vehicle: 2002 Jimny
|
Posted: Mon May 26, 2014 9:37 pm |
|
|
Hahaha. Cheers guys.
Cal123 - This is with a 2" OME suspension lift kit, and 235x75x15's.
|
|
|
|
|
Jezza86
Platinum Supporter
Joined: Tue Dec 06, 2011 9:30 am Posts: 2155 Location: Nhulunbuy 0880
Vehicle: 2010 jimny
|
Posted: Mon May 26, 2014 9:58 pm |
|
|
My 30"s tread is 1mm inside the guards. Lol
|
|
|
|
|
honour
Joined: Mon Oct 14, 2013 7:21 pm Posts: 239
Vehicle: 2002 Jimny
|
Posted: Mon May 26, 2014 10:02 pm |
|
|
|
|
JayKay
az supporter

Joined: Mon Jul 27, 2009 11:30 pm Posts: 1144 Location: Down Under Down Under
Vehicle: 2008 Jimny Standard As :-)
|
Posted: Tue May 27, 2014 10:19 am |
|
|
Very Cool, X3 on the AZ Guard Chop.
Got a couple pics from a distance, I need some convincing before I hack mine up.
|
|
|
|
|
honour
Joined: Mon Oct 14, 2013 7:21 pm Posts: 239
Vehicle: 2002 Jimny
|
Posted: Tue May 27, 2014 1:50 pm |
|
|
|
|
zukenutter
az supporter
Joined: Sun Feb 08, 2009 10:30 pm Posts: 9045 Location: Brisneyland
Vehicle: 2006 Jimny JLX
|
Posted: Tue May 27, 2014 1:56 pm |
|
|
going to do the rear to match?
_________________
Click WWW below for STICKERS
|
|
|
|
|
tanshi
az supporter

Joined: Tue Jan 09, 2007 10:30 pm Posts: 7719 Location: Brisbane
|
Posted: Tue May 27, 2014 2:04 pm |
|
|
your tyres are gonna grab that flange on up travel and pull it down
|
|
|
|
|
zukenutter
az supporter
Joined: Sun Feb 08, 2009 10:30 pm Posts: 9045 Location: Brisneyland
Vehicle: 2006 Jimny JLX
|
Posted: Tue May 27, 2014 2:40 pm |
|
|
^ hadn't thought of that but yeah with offset rims it probably will, although if you leave the sway bar on it'll probably not even come close. Depends on the shocks too.
_________________
Click WWW below for STICKERS
|
|
|
|
|
honour
Joined: Mon Oct 14, 2013 7:21 pm Posts: 239
Vehicle: 2002 Jimny
|
Posted: Tue May 27, 2014 3:11 pm |
|
|
Pardon my ignorance - what flange?
|
|
|
|
|
zukenutter
az supporter
Joined: Sun Feb 08, 2009 10:30 pm Posts: 9045 Location: Brisneyland
Vehicle: 2006 Jimny JLX
|
Posted: Tue May 27, 2014 3:13 pm |
|
|
I think he was calling the toothed folded lip the flange
_________________
Click WWW below for STICKERS
Last edited by zukenutter on Tue May 27, 2014 3:14 pm, edited 1 time in total.
|
|
|
|
|
honour
Joined: Mon Oct 14, 2013 7:21 pm Posts: 239
Vehicle: 2002 Jimny
|
Posted: Tue May 27, 2014 3:20 pm |
|
|
Ok cool. I don't think that with my current setup (2" OME lift springs and swaybars fitted), that the uptravel would be enough to go up under the guard, so it shouldn't be a problem (fingers crossed).
I have a day at Jakem this weekend though, so will see how it goes.
But yes, I see what you mean. If the tyre pushed up past the new garden edge trim, then would rip it back down on down travel. Something for those considering doing the chop to keep in mind. Perhaps using a much wider garden edge type material to cover the whole top of the wheel arch area, thus not giving an edge for the tyre to grab.
|
|
|
|
|
pete_79
Joined: Wed Feb 06, 2013 8:24 pm Posts: 1571
Vehicle: 91 Tin Top
|
Posted: Tue May 27, 2014 4:21 pm |
|
I didn't get which part he meant by the flange either. Maybe I'm way off the mark, but I thought he was talking about this bit.  It's the most obvious bit that could get caught on the tyre during up travel and I figured you would just trim it off anyway. I haven't noticed anyone else talking about 235 tyres touching the top plastic insert right up inside the guard. I could be wrong though....
|
|
|
|
|
tanshi
az supporter
Joined: Tue Jan 09, 2007 10:30 pm Posts: 7719 Location: Brisbane
|
Posted: Tue May 27, 2014 4:26 pm |
|
|
yes, the "toothed folded lip"
if your tyres arent tucking up that far why are you even cutting the guards?
|
|
|
|
|
honour
Joined: Mon Oct 14, 2013 7:21 pm Posts: 239
Vehicle: 2002 Jimny
|
Posted: Tue May 27, 2014 4:39 pm |
|
|
Pete - Yes, this was the main problem area. The bit you circled was the section I explained (quite vaguely) that I cable tied back to the original plastics, so is well out of the way now. Just wasn't in that particular photo. But the further back photos show it all tied back out of the way.
Tanshi - The tyres were hitting mostly on the area just mentioned, but instead of just cutting the corners off, I wanted to make it all look as consistent as possible, hence removing the whole flat section. Although it might not reach all the way up there, I figure the more space the tyres have, the better.
Last edited by honour on Tue May 27, 2014 6:27 pm, edited 1 time in total.
|
|
|
|
|
honour
Joined: Mon Oct 14, 2013 7:21 pm Posts: 239
Vehicle: 2002 Jimny
|
Posted: Tue May 27, 2014 4:41 pm |
|
zukenutter wrote: going to do the rear to match? Yeh, eventually. There's no scrubbing there at the minute, so no rush. But it does need a bit of flare to cover the tyre sticking out, so will do it in the same fashion to keep it consistent.
|
|
|
|
|
zukenutter
az supporter
Joined: Sun Feb 08, 2009 10:30 pm Posts: 9045 Location: Brisneyland
Vehicle: 2006 Jimny JLX
|
Posted: Tue May 27, 2014 5:21 pm |
|
|
Just cutting the corners off looks quite bad IMO. If you're going to cut it looks much better done evenly all the way around.
_________________
Click WWW below for STICKERS
|
|
|
|
|
honour
Joined: Mon Oct 14, 2013 7:21 pm Posts: 239
Vehicle: 2002 Jimny
|
Posted: Tue May 27, 2014 6:05 pm |
|
zukenutter wrote: Just cutting the corners off looks quite bad IMO. If you're going to cut it looks much better done evenly all the way around. My thoughts exactly. I cut the corners off originally just to make it safe for a few days. But definitely looks better now.
|
|
|
|
|
Zook2510
Joined: Tue Oct 08, 2013 3:24 pm Posts: 107
Vehicle: 2003 Jimny
|
Posted: Wed May 28, 2014 11:25 am |
|
|
This is great!! Thanks Scott for the details and photos.
|
|
|
|
|
vet 180

Joined: Mon May 05, 2014 11:50 am Posts: 1246
Vehicle: Vitara 1994
|
Posted: Sat May 31, 2014 6:03 am |
|
|
|
|
honour
Joined: Mon Oct 14, 2013 7:21 pm Posts: 239
Vehicle: 2002 Jimny
|
Posted: Sat May 31, 2014 7:06 am |
|
|
|
|
jimbo_jones
az supporter
Joined: Sat Jul 19, 2008 11:30 pm Posts: 4361 Location: gong
Vehicle: 2015 Jimny, LJ50, Maruti
|
Posted: Sun Apr 12, 2015 7:27 am |
|
|
Very good write up you could go a step further and weld the cut after you bend them
|
|
|
|
|
honour
Joined: Mon Oct 14, 2013 7:21 pm Posts: 239
Vehicle: 2002 Jimny
|
Posted: Sun Apr 12, 2015 7:58 am |
|
|
Certainly could Jimbo, would make for a much nicer finish. I actually just finished the rears up yesterday, so will put up a guide on that shortly.
|
|
|
|
|
honour
Joined: Mon Oct 14, 2013 7:21 pm Posts: 239
Vehicle: 2002 Jimny
|
Posted: Sun Jul 12, 2015 11:26 am |
|
|
|
|
|


