| Author |
Message |
pete_79


Joined: Wed Feb 06, 2013 8:24 pm Posts: 1571
Vehicle: 91 Tin Top

|
  Posted: Thu Mar 27, 2014 7:26 pm |
|
This is my little custom made camping trailer that I built to go behind our Jimny. I didn't end up doing a progress build because it only took 2 weeks to make (2 weekends and a couple of evenings), anyway I took heaps of photos and I'm happy to share. The most important points for this design was that it had to be as light as possible while being as strong as possible. I'm pretty happy with the balance I ended up with, it's nice and solid while only weighing 190kg all up. To start I drew up a set of plans complete with cutting lists for all materials and fold patterns for the side panels (you can PM me if you want a copy of my plans in PDF). Next I called in a favour from a customer of ours that makes conveyors, because as luck would have it my side and end panels were exactly the same profile as his conveyor sides and ends  After a few phone calls and checking a few dimensions I ordered an axle to match the Jimny track width, it was 30" from memory (*edit; it was 60"), anyway if I used stock Jimny rims and 205 tyres it ended up 10mm wider then the Jimny. I got F100 hubs, 2mm thick mud guards and eye to eye springs. I got a great deal from an engineering shop down in VIC, they really knew their stuff and were awesome to deal with. They where also very well priced (even with shipping), it only took 2 days to ship all of this up to Sydney from VIC. While all these other bits and pieces were in transit I cut and prepped all the SHS and angle iron pieces. Then it was just a big puzzle to put together. This is the first weekend:  I notched out the draw bar to make a stronger connection with the main centre brace.    And used gussets to support the front sections.  This is the angle iron and folded plate for the tailgate fitting up to the main side post.  And the whole tailgate.  Tailgate and both main side posts fitted to the main frame.  Clearances.  Fitting the, umm, front tailgate? with one fixed side on.  Sides and base on.  Box done, hinges and latches on.  Pretty happy with the first couple of days work... 
Last edited by pete_79 on Mon Mar 08, 2021 10:58 am, edited 5 times in total.
|
|
|
|
|
Joe
I live here!


Joined: Sat Jul 04, 2009 11:30 pm Posts: 49041 Location: Rockingham W.A
Vehicle: JB74
|
Posted: Thu Mar 27, 2014 8:16 pm |
|
Awesome work mate 
_________________
Joe likes boobs ( . )( . ) ( ° )( ° )
|
|
|
|
|
pete_79
Joined: Wed Feb 06, 2013 8:24 pm Posts: 1571
Vehicle: 91 Tin Top
|
Posted: Thu Mar 27, 2014 8:22 pm |
|
Thanks Joe.... 
|
|
|
|
|
pete_79
Joined: Wed Feb 06, 2013 8:24 pm Posts: 1571
Vehicle: 91 Tin Top
|
Posted: Thu Mar 27, 2014 8:30 pm |
|
The bits from VIC turned up mid week, so the springs and axel went on the night they arrived.   I didn't bother going spring over axle, it made the trailer coupling too high for the hitch position. 
Last edited by pete_79 on Mon Oct 16, 2017 6:00 pm, edited 2 times in total.
|
|
|
|
|
pete_79
Joined: Wed Feb 06, 2013 8:24 pm Posts: 1571
Vehicle: 91 Tin Top
|
Posted: Thu Mar 27, 2014 8:51 pm |
|
Last edited by pete_79 on Mon Oct 16, 2017 6:07 pm, edited 3 times in total.
|
|
|
|
|
Joe
I live here!
Joined: Sat Jul 04, 2009 11:30 pm Posts: 49041 Location: Rockingham W.A
Vehicle: JB74
|
Posted: Thu Mar 27, 2014 8:56 pm |
|
 how does it ride with the shackles on that angle? Edit: you need to get hold of a pair of suzuki centre caps 
_________________
Joe likes boobs ( . )( . ) ( ° )( ° )
|
|
|
|
|
pete_79
Joined: Wed Feb 06, 2013 8:24 pm Posts: 1571
Vehicle: 91 Tin Top
|
Posted: Thu Mar 27, 2014 9:10 pm |
|
Joe wrote: 8O how does it ride with the shackles on that angle? Really well actually. I stressed over those shackles a fair bit to tell the truth. The engineering shop I bought them off sent me mounting instructions that showed the shackles on that angle and I thought they can't be right. I rang them and checked, they assured me that the way they have to go on. These springs come from Adelaide and they had drawings in the shipping docs that show the same mounting position. I can't upload PDF files to photobucket, but I can assure you these are mounted as per the manufactures details. They are 4 leave springs only rated to 500kg, so I can only think that they get you to mount the hangers so far apart to allow for the springs to settle and sag. I did notice that with about 100kg in the trailer the shackles are nearly vertical, so assuming after a few trips they'll settle a bit lower. If not I can always take a leaf out to soften it up a bit OR just grind off the mounts and move them out. Don't think I will need to though, as I say it rides really well so far.
|
|
|
|
|
pete_79
Joined: Wed Feb 06, 2013 8:24 pm Posts: 1571
Vehicle: 91 Tin Top
|
Posted: Thu Mar 27, 2014 9:27 pm |
|
Can't upload PDFs to photobucket, but a JPG of a screen shot works.... This is the manufacturers fitting instructions (mine are part number GIES1187/4AU). 
Last edited by pete_79 on Tue Oct 10, 2017 8:01 pm, edited 1 time in total.
|
|
|
|
|
Joe
I live here!
Joined: Sat Jul 04, 2009 11:30 pm Posts: 49041 Location: Rockingham W.A
Vehicle: JB74
|
Posted: Thu Mar 27, 2014 10:09 pm |
|
Yeah fair enough as long as it works that's all the matters
_________________
Joe likes boobs ( . )( . ) ( ° )( ° )
|
|
|
|
|
christover1
az supporter

Joined: Tue Jul 15, 2008 11:30 pm Posts: 8203 Location: Melbourne
Vehicle: Pajero 91 NH 3.0 SWB
|
Posted: Fri Mar 28, 2014 6:31 am |
|
|
Nice to see another trailer build, well done.
|
|
|
|
|
pete_79
Joined: Wed Feb 06, 2013 8:24 pm Posts: 1571
Vehicle: 91 Tin Top
|
Posted: Fri Mar 28, 2014 9:49 am |
|
christover1 wrote: Nice to see another trailer build, well done. Thanks Chris, I've enjoyed both of your trailer builds.
|
|
|
|
|
pete_79
Joined: Wed Feb 06, 2013 8:24 pm Posts: 1571
Vehicle: 91 Tin Top
|
Posted: Fri Mar 28, 2014 9:57 am |
|
And the finishing touches.... 360 degree coupling.  The standard quick release coupling hit the spare tyre with the hitch up and with the hitch down the trailer didn't sit level. With the off road coupling it clears the tyre easy and the trailer sits level.  Plenty of room to open the rear door with trailer on.  And then the under side went from this.  To this. 
Last edited by pete_79 on Mon Oct 16, 2017 5:46 pm, edited 1 time in total.
|
|
|
|
|
Jezza86
Platinum Supporter

Joined: Tue Dec 06, 2011 9:30 am Posts: 2155 Location: Nhulunbuy 0880
Vehicle: 2010 jimny
|
Posted: Fri Mar 28, 2014 11:03 am |
|
|
|
|
pete_79
Joined: Wed Feb 06, 2013 8:24 pm Posts: 1571
Vehicle: 91 Tin Top
|
Posted: Fri Mar 28, 2014 11:41 am |
|
|
Yeah, but you can't fit a 6 burner BBQ in this one.....
|
|
|
|
|
killazook
az supporter

Joined: Wed Sep 11, 2013 7:37 pm Posts: 230
Vehicle: 92 wt soft top sierra
|
Posted: Fri Mar 28, 2014 2:00 pm |
|
|
Awesome work and man you really did hook in
|
|
|
|
|
pete_79
Joined: Wed Feb 06, 2013 8:24 pm Posts: 1571
Vehicle: 91 Tin Top
|
Posted: Fri Mar 28, 2014 4:54 pm |
|
|
It was 2 weeks from ordering all the parts to have it ready for rego. That was with the quick release coupling and before I painted the tar underneath.
I built the thing quicker then all the government departments could get their shit together to register it... What a joke the rego process is in NSW...
|
|
|
|
|
pezz
az supporter

Joined: Fri May 15, 2009 11:30 pm Posts: 2108 Location: western vic
Vehicle: sj51
|
Posted: Fri Mar 28, 2014 7:20 pm |
|
|
great build,
this gives me motivation to get some work done with mine... if i can finally lock in some design features
if you dont mind disclosing, what was your total build cost excluding rego?
|
|
|
|
|
pete_79
Joined: Wed Feb 06, 2013 8:24 pm Posts: 1571
Vehicle: 91 Tin Top
|
Posted: Sun Mar 30, 2014 10:15 am |
|
pezz wrote: great build,
this gives me motivation to get some work done with mine... if i can finally lock in some design features
if you dont mind disclosing, what was your total build cost excluding rego? Thanks Pezz. I don't mind disclosing, but I got a few freebies for this one. 1 full length of 40x40x2mm SHS and 1 full length of 40x40x3 angle where donated by work. All the sheet steel and labour for the sides and floor was donated by a friend from work, this was a sheet and a half of 1.6mm galv. Before I asked my mate from work for the favour I looked at buying the pre-folded side panels from a trailer shop, from memory they were about $180-$200 for a 2.4m panel that I was going to cut in half. I already had all of the consumables (cutting wheels, welding rods, ect) at home. The bits I did buy: Trailer kit (quick release coupling, mud guards, springs, axle, hubs and bearings ect) = ~$500 delivered 2m of 65x65x3 SHS for the draw bar and 2m of 65x35x3 RHS for the centre brace, plus other little bits and pieces of steel = $80 Safety chain, hinges, latches, lights, cables, wiring connectors ect = ~$150 2 x second hand Jimny rims from the wreckers and 1 second hand tyre to match the 1 good tyre that was on the rims = $120 Way too many pressure pack cans of cold gal, etch primer and colourbond paint = $100+ (I used a colourbond colour to make it easy for touch ups in the future) Total to get to rego stage = $950 (give or take) That's pretty much what a new 5'x3'6" trailer is worth from the likes of Mario Trailers in Sydney. Those trailers aren't as solid as I would like for off road work, they have an angle iron sub frame and draw bar, slipper springs and lighter gauge sides, but they still weigh over 200kg. I looked at heaps and heaps of new and second-hand trailers and figured if I wasn't going to get much change out of $1,000.00 for something I was only going to modify, I might as well just build the whole thing the way I wanted it from the ground up for about the same money.
|
|
|
|
|
shep

Joined: Thu Mar 29, 2007 11:30 pm Posts: 14499 Location: Here there everywhere
Vehicle: A manly awesome man jimny
|
Posted: Sun Mar 30, 2014 11:26 am |
|
On the shackle angle. It is a very common mistake to confuse car and trailer shackle angles. A car needs articulation while a trailer needs stability and load carrying capasity. Eg my trailer weighs 250kg but is legal to have a load of 950kg for a all up weight of 1200kg. No car suspension is designed to carry 4 times the cars weight. The correct trailer shackle angle makes a massive difference to the way a trailer works. My trailer shackle angle is the same as pete's and is what the spring manufacture specifies 
_________________
JEEPJEEPJEEPJEEPJEEPJEEPJEEPJEEPJEEP
|
|
|
|
|
pete_79
Joined: Wed Feb 06, 2013 8:24 pm Posts: 1571
Vehicle: 91 Tin Top
|
Posted: Sun Mar 30, 2014 11:49 am |
|
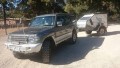
Thanks Shep. I was sure I was right, but it's reassuring to know I hadn't stuffed up that bit.... Here's a few picks from the maiden voyage.     I'm really happy with how it went. We did a couple of decent hill climbs and descents and threw in a few wheel deep creek crossings to test it out. Gotta say, I wasn't disappointed at all, it handled everything really well and the Jimny had no problems dragging it around either.
|
|
|
|
|
Joe
I live here!
Joined: Sat Jul 04, 2009 11:30 pm Posts: 49041 Location: Rockingham W.A
Vehicle: JB74
|
Posted: Sun Mar 30, 2014 1:03 pm |
|
shep wrote: On the shackle angle. Well there ya go i never thought about it like that but now that you've said it it makes sence 
_________________
Joe likes boobs ( . )( . ) ( ° )( ° )
|
|
|
|
|
pezz
az supporter
Joined: Fri May 15, 2009 11:30 pm Posts: 2108 Location: western vic
Vehicle: sj51
|
Posted: Sun Mar 30, 2014 1:12 pm |
|
pete_79 wrote: I might as well just build the whole thing the way I wanted it from the ground up for about the same money. sounds fair, i looked around at 5x3's as well but was bitterly disappointed by the build quality from trailer shops.. hence why i am building one too.. i can only hope mine comes out as neat as yours
|
|
|
|
|
pete_79
Joined: Wed Feb 06, 2013 8:24 pm Posts: 1571
Vehicle: 91 Tin Top
|
Posted: Mon Mar 31, 2014 4:19 pm |
|
We've got an extended trip coming up soon that I'm going to need to take some extra fuel and water that we won't need for most other camping trips. So I wanted to have something removable to hold the extra jerry cans and came up with this:  It can hold 3 x 20L jerry cans, but that's more then I'll ever need (and more weight then I'd like to have on the draw bar) so I think I'll make up a bracket to mount our little 2kg gas bottle directly over the bar with a jerry can either side.  This shows the mounting brackets and support bars under the outside jerry cans. It's 50x50x3 angle with 2 x 10mm bolts under each jerry can and I can put a u-bolt to tie the tray into the draw bar if it's really needed. At this stage I don't think I'll need the u-bolt, but we'll see how it goes. The straps and bit of timber on the gas bottle is just for this test fit up, as I said I will make a steel cradle with lockable straps for it before I go anywhere with it. 
Last edited by pete_79 on Mon Oct 16, 2017 6:13 pm, edited 1 time in total.
|
|
|
|
|
Dan85
az supporter

Joined: Mon Sep 10, 2012 8:43 pm Posts: 389 Location: laurieton
Vehicle: 2012 jimny
|
Posted: Sat Apr 05, 2014 12:02 pm |
|
|
Nice trailer build looks good. Wish I could weld like that. Outa curiosity how much fuel does it use with the trailer and roof basket?
|
|
|
|
|
pete_79
Joined: Wed Feb 06, 2013 8:24 pm Posts: 1571
Vehicle: 91 Tin Top
|
Posted: Sat Apr 05, 2014 9:01 pm |
|
Dan85 wrote: Outa curiosity how much fuel does it use with the trailer and roof basket? The roof basket is on all the time, usually get around 320/350k's from about 35/37Lt. Depending who's driving it the most (my foot's a bit heavier then the misses  ). Didn't notice any real increase in consumption with the couple of runs I've done with the trailer so far. Will have a better idea how it all goes after Easter.
|
|
|
|
|
Dan85
az supporter
Joined: Mon Sep 10, 2012 8:43 pm Posts: 389 Location: laurieton
Vehicle: 2012 jimny
|
Posted: Sat Apr 05, 2014 9:11 pm |
|
|
|
|
pete_79
Joined: Wed Feb 06, 2013 8:24 pm Posts: 1571
Vehicle: 91 Tin Top
|
Posted: Sun Apr 06, 2014 2:49 pm |
|
Sorted the 2kg gas bottle mount on the trailer draw bar today. I couldn't find anywhere that did a 2kg trailer mount so had to fab one from scratch.....   Fits neat between the water and fuel.  
Last edited by pete_79 on Mon Oct 16, 2017 6:19 pm, edited 1 time in total.
|
|
|
|
|
pete_79
Joined: Wed Feb 06, 2013 8:24 pm Posts: 1571
Vehicle: 91 Tin Top
|
Posted: Mon Apr 07, 2014 5:46 pm |
|
pete_79 wrote: I ordered an axle to match the Jimny track width, it was 30" from memory I was going through some old files today and found the original docs from the guys I got the trailer kit off, turns out it was actually a 60" axel..... 
Last edited by pete_79 on Mon Oct 16, 2017 6:23 pm, edited 1 time in total.
|
|
|
|
|
zukenutter
az supporter

Joined: Sun Feb 08, 2009 10:30 pm Posts: 9045 Location: Brisneyland
Vehicle: 2006 Jimny JLX
|
Posted: Mon Apr 07, 2014 6:00 pm |
|
You do way better metal fab than me, not that it's hard. Seriously though, very neat trailer and thanks for such a detailed build thread. Joe wrote: shep wrote: On the shackle angle. Well there ya go i never thought about it like that but now that you've said it it makes sence X2 thanks Shep
_________________
Click WWW below for STICKERS
|
|
|
|
|
pete_79
Joined: Wed Feb 06, 2013 8:24 pm Posts: 1571
Vehicle: 91 Tin Top
|
Posted: Tue Apr 08, 2014 6:49 pm |
|
zukenutter wrote: thanks for such a detailed build thread. I've been sponging so much info and ideas from this forum over the last couple of years I'm glad I can finally give something back...
|
|
|
|
|
|


