| auszookers.com https://www.auszookers.com/forum/ |
|
| Sierra Brake upgrade & rear disc conversion https://www.auszookers.com/forum/viewtopic.php?f=17&t=21172 |
Page 1 of 3 |
| Author: | tmb99 [ Wed Apr 20, 2011 9:01 am ] |
| Post subject: | Sierra Brake upgrade & rear disc conversion |
Stuff you will need Wheel brace Jack (preferably trolley) wheel chocks (or wood/brick) Wheel stands 10 & 12mm spanner 12, 14, 17, 19 sockets Brake Fluid Vice grips (optional) 24 & 27 socket (transfer brake only) What & Why Ok so this is a brake upgrade that anyone could tackle it. BenT's kit comes with instructions and its not hard but this is more so to give someone the confidence to tackle it by seeing how easy it is. For this upgrade I'm using Vitara vented front discs with the calipers and discs off a LWB Vitara. I'm then using the Sierra fronts on the rear with BenT's kit. I used a transfer handbrake off a 1ltr case. I go through rear pads quickly - I don't look for mud but it finds me. I do take the rear drum off to wash but its a pain, and I like the idea of rear discs so no loss of performance after water and having an overall performance increase. Disclaimer These are your brakes, they stop your car, they stop you hitting things, they are important. I take no responsibility for you making a mistake and messing up you ability to do the aforementioned things.... Vitara Front 1. Chock the rear wheels, car in gear and jack up the front, use vehicle stands and then take the front wheels off. ![]() 
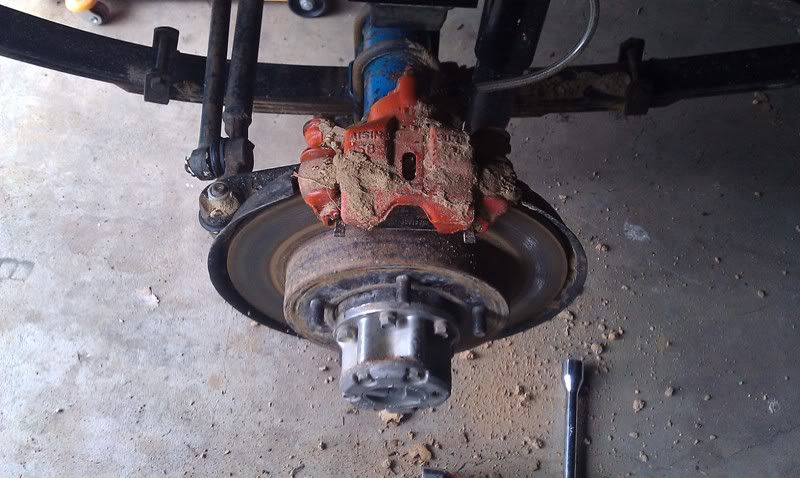
you can now see the front caliper and disc, check out the condition of the disc and your pads make sure they're safe for use. If you have rubber front hoses clip the vice grips onto the line which will stop a lot of the fluid draining out # Brake fluid is corrosive to painted surfaces so be careful throughout this whole process. if you get it on a painted surface wash it with soapy water quickly. 
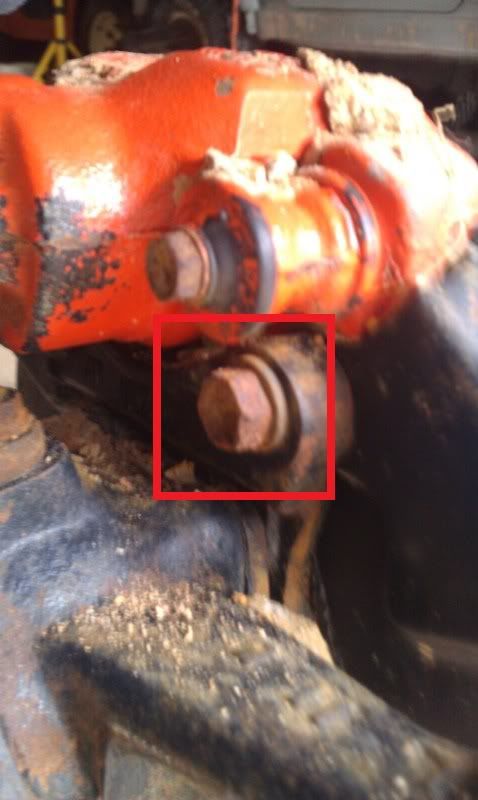
2. Undo the 2 bolts behind the caliper. Hold the caliper up out of the way with some wire. ![]() 
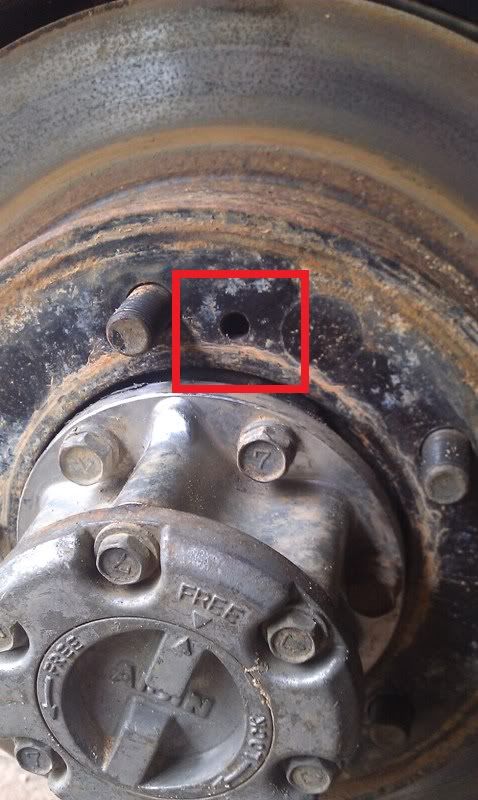
you can now take the disc off, give it a tap with a soft faced hammer. If this doesn't do much then there are 2 bolt holes in each disc. Put a bolt in and alternating tighten them up until they pop the disc off. ![]() 
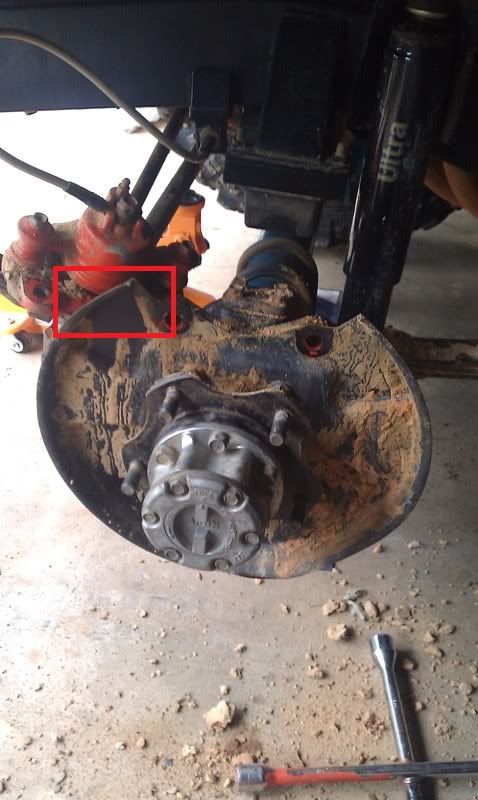
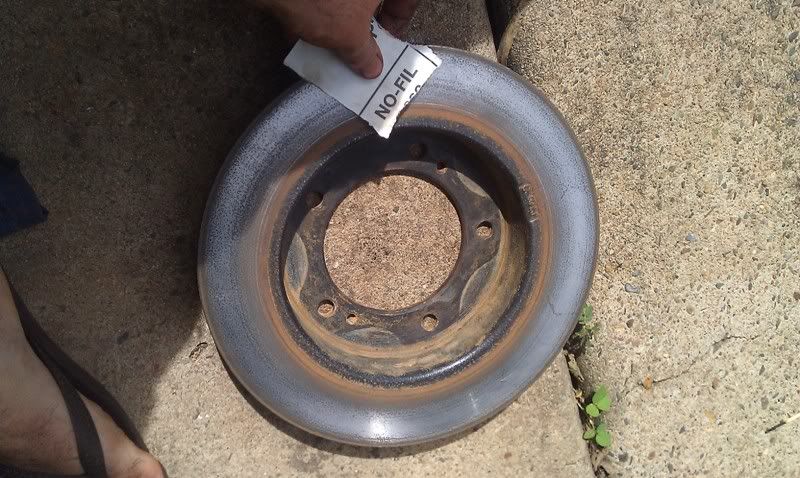
3. You should now have the bare backing plate. Some people ditch this and you can see why in this pic - it's a good mud trap. But for the road worthiness I chose to leave it. I did however trim the top (marked in the pic) to make brake bleeding easier . You'll find out about this later. ![]() 4. If you're using second hand discs then give them a clean with sand paper working in circles. Nothing too coarse I used 240grit. This is especially important if you're using new pads, it just gets rid of any glaze and helps bed new pads in. Ok reverse everything so far - put disc on, finger tighten caliper bolts on and we're done on the front for now. This could be done by itself for a good improvement. As we're removing other parts we won't bleed out the system just yet... Rear Disc conversion 
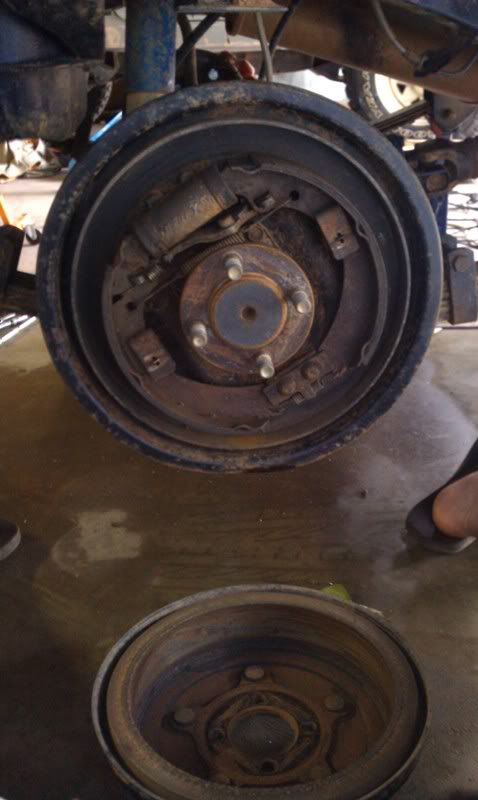
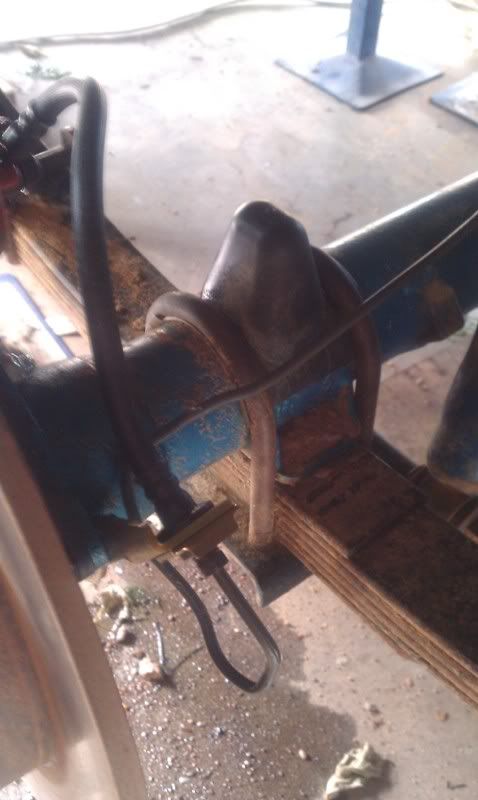
1. Jack, chock and prop the rear, remove tyres and this is what you'll see. The bolts in the middle hold on the drum. Take them all off and you'll be faced with the second pic. ![]() ![]() 
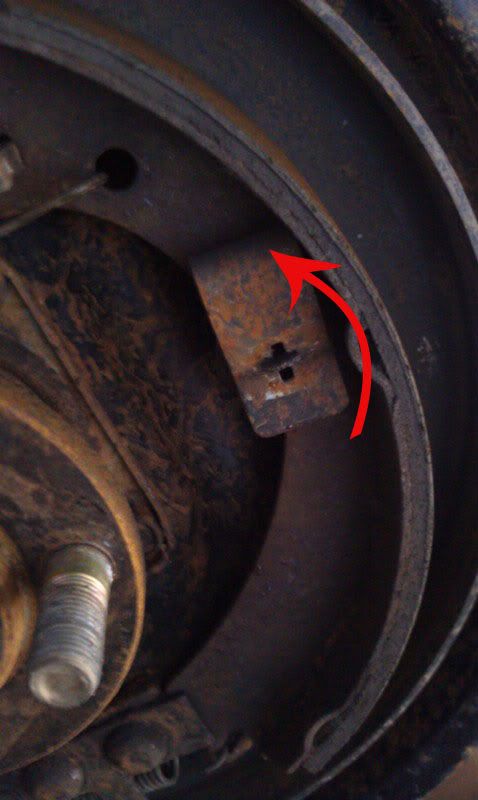
These pins hold the pads in. Half turn them with pliers while pushing down on the plate and they pop off. 2. Now grab the pads and wrestle them out, careful not to get shot in the eye by the springs. Put it all in a box. Disconnect the handbrake, take the split pin out and push out the pin holding it in there. Pull all the handbrake stuff off and put it in that box. ![]() 
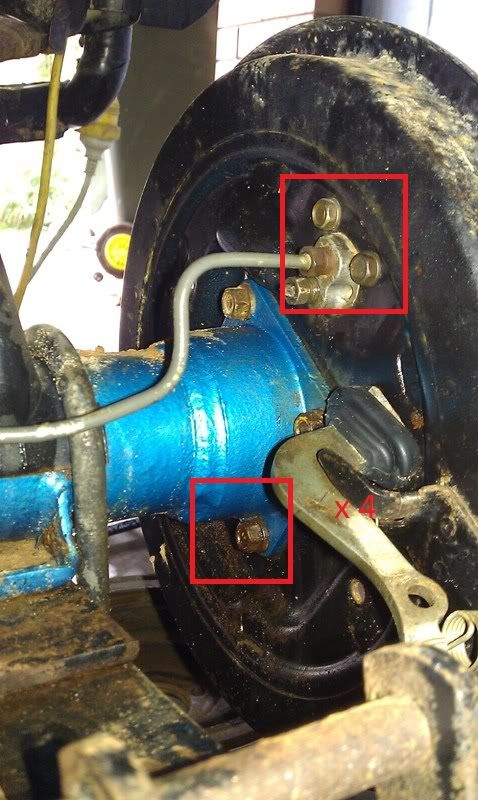
3. Pull out the 4 bolts attaching the axle to the backing plate. Clamp your rubber hose with vice grips and disconnect the hardlines from the wheel cylinder. Put it all in that box, most of the bolts you won't need as the kit has new ones! ![]() 
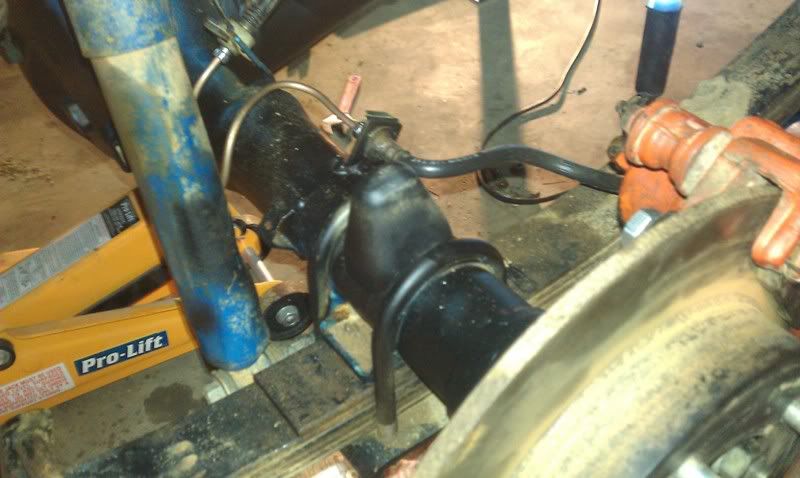
So you don't have to drain the diff oil you will have to jack one side up. I had vehicle stands under the chassis and then used my trolley jack under the spring plate on one side raising it about 10cm higher. Give the car a good shake make sure its solid! 
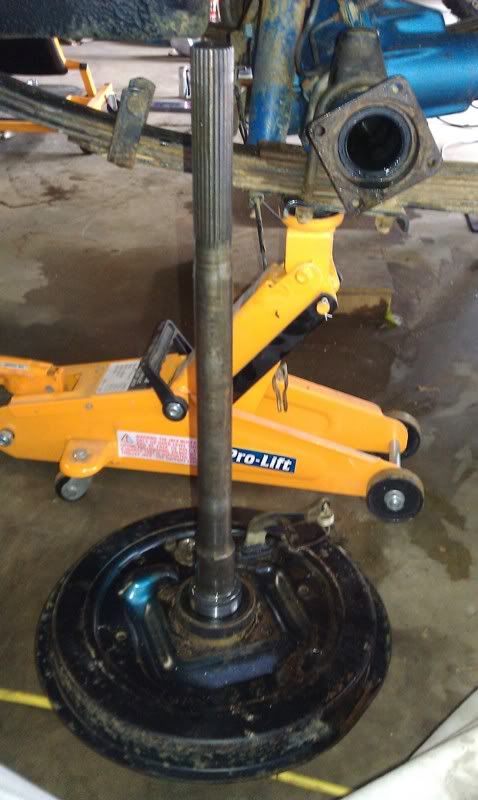
Now make sure nothing is still connected. Put the drum and wheel back on as we're going to use it as a slide hammer to pull the axle. So doing the bolts only on part way then pull back on the wheel shocking the axle out. ! make sure the vehicle is well supported ! As soon as the axle pops, support the weight and undo the wheel and drum as they will be resting on the seal. This what you should see... ![]() 
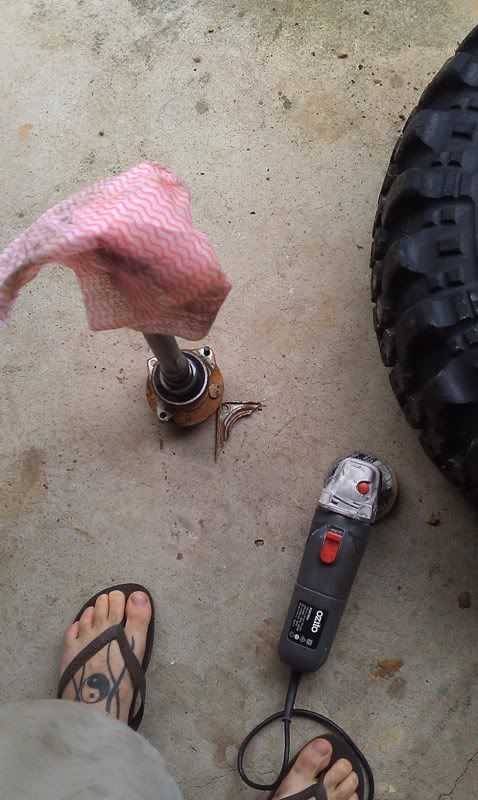
Ok put the brake backing plate in that box. We have 2 options here, if you're doing wheel bearings and seals go for it. I wasn't so I had to cut the smaller backing plate off the axle - very carefully using a grinder. ![]() 4. Clean everything. This includes the axle and seals and diff face. Make it all pretty. Oh this pic shows it all dirty, not my version of clean! ![]() 
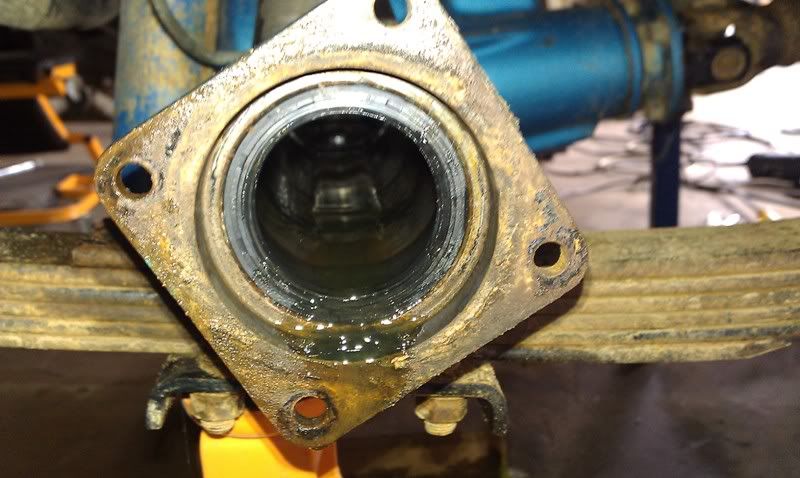
Give the bearing surfaces a wipe of grease. Carefully slide the axle back in and tap it home. ![]() 
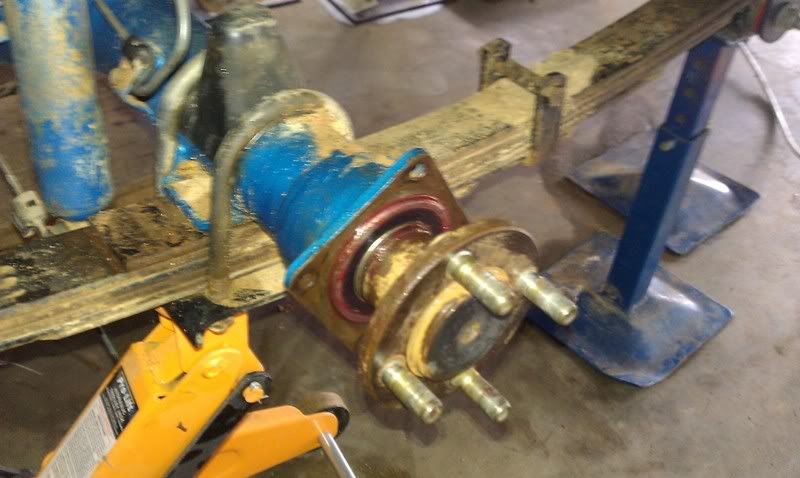
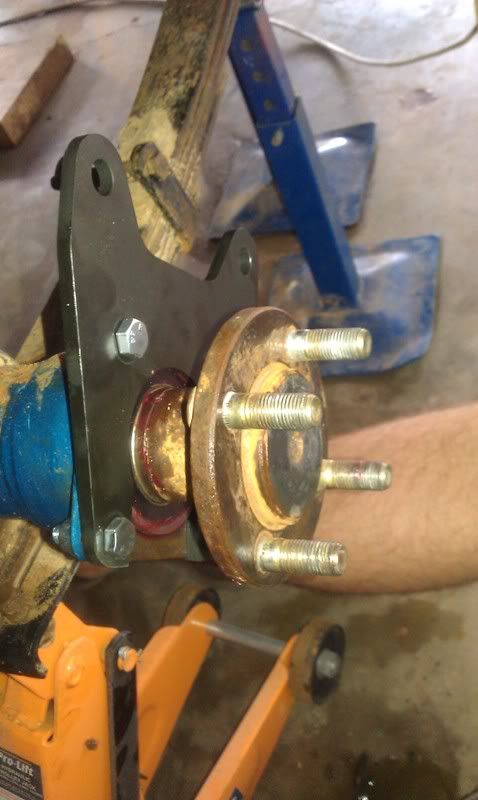
5. Put the caliper mounting plate on. Follow BenT's instructions as placement is different for NT vs WT. There is also a bracket for holding the flexy hose I have a really crap pic of it, it goes on the bolts holding this plate on. ![]() Using the supplied bolts and nyloc nuts bolt her up. ![]() 
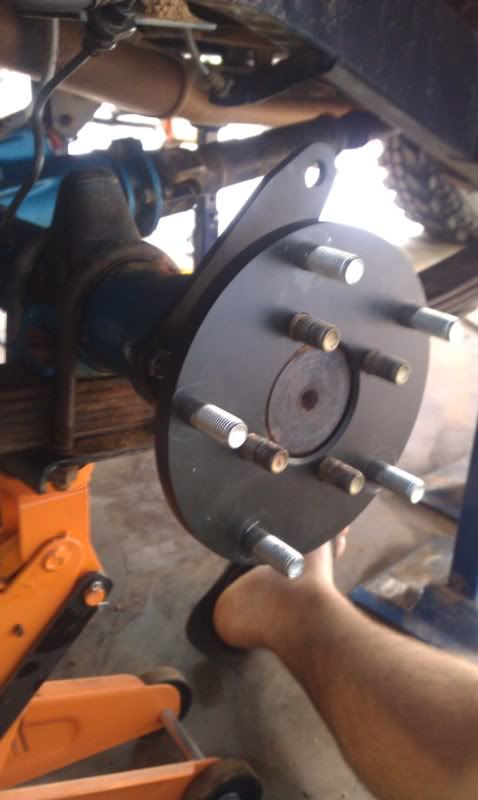
6. Disc adapter. Seat the supplied wheel studs using a press or vice. I snapped my vice and hit myself in the head with the large pipe I was using on it. So I used a deep socket and careful hammer (not recommended but worked). The wheel studs hold your wheel on so make sure they're seated well! Fit disc adapter ![]() 
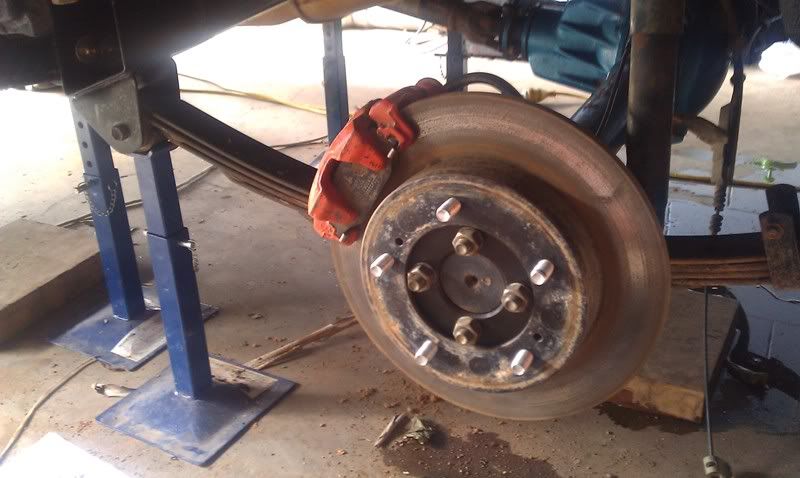
Fit discs again remove any glaze first and fit disc and loose fit caliper ![]() ![]() 7. Final step. Fit hardlines. I went to my local Enzed, they had a T piece in stock and made me a hardline going to each side. Get a piece of fencing wire and bend it up for the length of the line. It'll also make a good template which makes bending the new lines easier. I also chose to put my hose bracket on the diff. ![]() Bleed the system. Now important tip, the bleeder nipple must be the highest point when bleeding, so both front and back calipers had to be repositioned to achieve this. I just spun them on the disc. Start bleeding at the back passenger and work around to the front passenger caliper. Tighten everything up and that's the brakes done! Garage test, then road test and follow bedding procedure for new pads. Come back check all bolts and check for leaks. Final step, that box of bits put it in the back of the shed as one day someone will be like "does anyone have a spare (drum/wheel cylinder/pad/spring/whatever) I need one for the weekend so I can go wheeling" and you can help them out.... or throw it in the bin. Brake proportioning. Mine is awesome with just the calipers, no adjuster needed. My fronts lock before the rear and my pedal feel is great. I'm stoked as straight-away it felt really good, heaps stronger. Final word of warning. Brakes are important, if you're not sure about anything that your hearing or feeling seek professional advice. Transfer Handbrake TBC... |
|
| Author: | Bruce [ Wed Apr 20, 2011 9:16 am ] |
| Post subject: | Re: Sierra Brake upgrade |
Bloody good write-up |
|
| Author: | zooky08 [ Wed Apr 20, 2011 9:21 am ] |
| Post subject: | Re: Sierra Brake upgrade |
This will help me when I do mine Ben t just ran out of kits so I have to wait Good write up |
|
| Author: | Rusho [ Wed Apr 20, 2011 9:24 am ] |
| Post subject: | Re: Sierra Brake upgrade |
Bruce wrote: Bloody good write-up
x2
|
|
| Author: | shep [ Wed Apr 20, 2011 9:26 am ] |
| Post subject: | Re: Sierra Brake upgrade |
that should keep the angry midget happy for a bit. |
|
| Author: | tmb99 [ Thu Apr 21, 2011 3:04 am ] |
| Post subject: | Re: Sierra Brake upgrade & rear disc conversion |
Ok all done with transfer brake details, I'll update those as I fix it up more. Also here is a link to some of the questions that I had prior and throughout the process, may help, may not; http://www.auszookers.com/index.php?nam ... ic&t=21036 |
|
| Author: | Teracis [ Thu Apr 21, 2011 4:54 am ] |
| Post subject: | Re: Sierra Brake upgrade & rear disc conversion |
For those of you who want to do this but cannot source a transfer case handbrake. http://www.lowrangeoffroad.com/index.ph ... e-kit.html I HAVE NOT USED THIS AND ONLY POST IT HERE BECAUSE I FOUND IT ON LOWRANGE AND THOUGHT IT MIGHT HELP. Short story, do some research on it but it looks like it would work. |
|
| Author: | Gwagensteve [ Thu Apr 21, 2011 9:56 pm ] |
| Post subject: | Re: Sierra Brake upgrade & rear disc conversion |
I have fitted one, but not in the "normal" way as the car I was fitting it to also has a Trail Tough disconnect. Spidetrax stuff is well engineered, and it will install with no problems. However, the caliper used is a wilwood go-kart caliper and is not self adjusting. Because of the very small pad area, it will need regular adjustment to keep it operating effectively. This isn't really different to the 1.0/1.3NT transfer brake, which isn't self adjusting either, but it's worth knowing. It's also quite expensive for a small mechanical caliper and some bolts and brackets. The handbrake on WT sierras IS self adjusting as it's on the rear shoes. Personally, if you're not concerned about legality (and if you are fitting a rear disk brake kit without engineering approval, you're not) then run a line locker. PS Excellent writeup. |
|
| Author: | 31zook [ Fri Apr 22, 2011 11:15 am ] |
| Post subject: | Re: Sierra Brake upgrade & rear disc conversion |
good write up |
|
| Author: | SierraDan [ Fri Apr 22, 2011 11:53 am ] |
| Post subject: | Re: Sierra Brake upgrade & rear disc conversion |
Gwagensteve wrote: Personally, if you're not concerned about legality (and if you are fitting a rear disk brake kit without engineering approval, you're not) then run a line locker.
PS Excellent writeup. Ive read a few people saying theyre crap. Theyve turned around and their zook is rolling down a hill. |
|
| Author: | Junior_91 [ Wed Jun 01, 2011 11:17 am ] |
| Post subject: | Re: Sierra Brake upgrade & rear disc conversion |
How is the axle actually held in? |
|
| Author: | tmb99 [ Wed Jun 01, 2011 10:45 pm ] |
| Post subject: | Re: Sierra Brake upgrade & rear disc conversion |
When converted its the plate that you can see in this pic holds the bearing/axle in
On a standard suzuki its the plate you can see I cut off here
|
|
| Author: | UBZ [ Thu Jun 02, 2011 12:14 am ] |
| Post subject: | Re: Sierra Brake upgrade & rear disc conversion |
thought this should be added to this thread. Standard front calipers are not compatible when doing a rear disc conversion on a NT ( Narrow Track) the caliper brake hose bolt will contact on the chassis bump stop under compression. you have to use vitara LWB calipers on the rear with standard front rotors to clear the bump stop. The vitara caliper break hose inlet is on the side , compared to the rear inlet on te stock caliper, however creative hose routing is required to avoid creating an air lock in the break system. hope this helps someone as all the info I read on the web before doing my conversion never mentioned this at all. |
|
| Author: | Fatzook [ Thu Jun 02, 2011 12:34 am ] |
| Post subject: | Re: Sierra Brake upgrade & rear disc conversion |
UBZNZ wrote: thought this should be added to this thread.
Standard front calipers are not compatible when doing a rear disc conversion on a NT ( Narrow Track) the caliper brake hose bolt will contact on the chassis bump stop under compression. you have to use vitara LWB calipers on the rear with standard front rotors to clear the bump stop. The vitara caliper break hose inlet is on the side , compared to the rear inlet on te stock caliper, however creative hose routing is required to avoid creating an air lock in the break system. hope this helps someone as all the info I read on the web before doing my conversion never mentioned this at all. I think thats a terrible idea! The LWB vits run vented front discs which allow for better braking than the sierra fronts. Having stronger brakes on the rear is dangerous. SWB vit calipers would be better, as the run a solid disc like sierras, but have the same funky hose arrangement as the LWB. |
|
| Author: | BenT [ Thu Jun 02, 2011 1:15 am ] |
| Post subject: | Re: Sierra Brake upgrade & rear disc conversion |
UBZNZ wrote: thought this should be added to this thread.
Standard front calipers are not compatible when doing a rear disc conversion on a NT ( Narrow Track) the caliper brake hose bolt will contact on the chassis bump stop under compression. you have to use vitara LWB calipers on the rear with standard front rotors to clear the bump stop. The vitara caliper break hose inlet is on the side , compared to the rear inlet on te stock caliper, however creative hose routing is required to avoid creating an air lock in the break system. hope this helps someone as all the info I read on the web before doing my conversion never mentioned this at all. You can run Sierra front calipers on the rear of an NT, you just need to bolt the bracket on at 90 degrees so the caliper is in front of or behind the wheel instead of above it. When bleeding the brakes you just un-bolt the caliper , rotate it 90 degres so the nipple is at the top, and put a bit of wood in place of the disc. |
|
| Author: | UBZ [ Thu Jun 02, 2011 5:24 am ] |
| Post subject: | Re: Sierra Brake upgrade & rear disc conversion |
Fatzook wrote: I think thats a terrible idea! The LWB vits run vented front discs which allow for better braking than the sierra fronts. Having stronger brakes on the rear is dangerous. SWB vit calipers would be better, as the run a solid disc like sierras, but have the same funky hose arrangement as the LWB. I should have mentioned that I have used a proportioning valve on the rear disc's to maintain correct break bias ( as you should for any rear disc conversion) . however they may be SWB calipers as I'm running solid rotors. but I was told they are LWB calipers. BenT wrote: You can run Sierra front calipers on the rear of an NT, you just need to bolt the bracket on at 90 degrees so the caliper is in front of or behind the wheel instead of above it. I initially fixed my contact issue by running the caliper on the rear, but was having issues with rocks and wood on our rutted tracks over here , and wanted the calipers back up on the top |
|
| Author: | 86slowsierra [ Mon Jan 30, 2012 5:52 pm ] |
| Post subject: | Re: Sierra Brake upgrade |
Bruce wrote: Bloody good write-up probably was at some point. not any more however. |
|
| Author: | boost=money [ Fri Feb 03, 2012 7:15 am ] |
| Post subject: | Re: Sierra Brake upgrade & rear disc conversion |
Where is the write up? |
|
| Author: | tmb99 [ Fri Feb 03, 2012 9:50 am ] |
| Post subject: | Re: Sierra Brake upgrade & rear disc conversion |
I re-posted it, luckily I wrote the original in word. It was slightly refined the first time, that's why it was edited so many times, however I now don't know what for - most likely typos. Info is all correct.... |
|
| Author: | selaga [ Fri Feb 03, 2012 2:02 pm ] |
| Post subject: | Re: Sierra Brake upgrade & rear disc conversion |
Just an observation, any reason why the bearing is not retained 360*. Is it to save the weight off the bracket ? Any issues with rear disc rotor not being hub centric ? |
|
| Author: | christover1 [ Fri Feb 03, 2012 2:53 pm ] |
| Post subject: | Re: Sierra Brake upgrade & rear disc conversion |
selaga wrote: Just an observation, any reason why the bearing is not retained 360*. It is for ease of fitment, on my Vitaras rear discs. The gap is filled on my rear discs when complete. I not sure if Sierras have the same reason. |
|
| Author: | 86slowsierra [ Tue Feb 07, 2012 3:18 pm ] |
| Post subject: | Re: Sierra Brake upgrade & rear disc conversion |
selaga wrote: Just an observation, any reason why the bearing is not retained 360*. Is it to save the weight off the bracket ? Any issues with rear disc rotor not being hub centric ? nah weight has nothing to do with it.IMHO it's like that so the kit can be installed without having to redo the bearings. FYI when i cut the drums off my NT i left a square portion that mates to the diff housing. this way the bearing is sealed/ retained better. i dont believe that this will effect the kit in anyway. sorry no pics yet. as for hub centric. im going to trust the kit maker on this one as in the 8 years ive been a web wheeler ive never heard of this being a problem on any forum in any country. |
|
| Author: | Gwagensteve [ Tue Feb 07, 2012 3:56 pm ] |
| Post subject: | Re: Sierra Brake upgrade & rear disc conversion |
I think it helps wheel bearing life no end to leave the cut down backing plate in place. We have a car in the club that has a rear disc conversion done the same way, with the bearing exposed like that and it eats wheel bearings. The rear drum isn't hub centric either. Sierras use tapered wheels/wheel nuts for alignment and therefore the hubs/ rims aren't hub centric. Steve. |
|
| Author: | Damo [ Tue Feb 07, 2012 4:38 pm ] |
| Post subject: | Re: Sierra Brake upgrade & rear disc conversion |
selaga wrote: Just an observation, any reason why the bearing is not retained 360*. Is it to save the weight off the bracket ? So you can get it on and off without having to pull the axle. I have the same setup on my brackets and it causes no problems. EDIT: I just read Steven's comment, and I don't run in epic Vic mud, so there is something to think about. selaga wrote: Any issues with rear disc rotor not being hub centric ? There's no issues with the same setup on the front so I can't imagine it being a problem on the rear. |
|
| Author: | Joshyboy26 [ Sun Mar 11, 2012 2:46 pm ] |
| Post subject: | Re: Sierra Brake upgrade & rear disc conversion |
are they brake lines the same fittings on each end for both the vitara and sierra or do i need to use one or the other? |
|
| Author: | Gwagensteve [ Sat Mar 17, 2012 1:23 pm ] |
| Post subject: | Re: Sierra Brake upgrade & rear disc conversion |
Yes - brake line fittings are the same between models. Steve. |
|
| Author: | Blueberry [ Mon Apr 30, 2012 10:37 pm ] |
| Post subject: | Re: Sierra Brake upgrade & rear disc conversion |
can anyone tell me if theres a difference between swb and lwb vitara front calipers? |
|
| Author: | Daz7 [ Tue May 01, 2012 8:58 am ] |
| Post subject: | Re: Sierra Brake upgrade & rear disc conversion |
Question - do all lwb Vitaras have the same front discs and calipers? Looking at ordering a set but want to know I'm getting the right ones for the conversion. |
|
| Author: | Fatzook [ Tue May 01, 2012 1:22 pm ] |
| Post subject: | Re: Sierra Brake upgrade & rear disc conversion |
Blueberry wrote: can anyone tell me if theres a difference between swb and lwb vitara front calipers? Yes. SWB runs a solid disc. It only opens up enough for its pads, and a solid disc. The LWB runs a much thicker vented disc. It opens up alot more to allow for the vented disc. The calipers MUST be run with their corresponding rotors. |
|
| Author: | Fatzook [ Tue May 01, 2012 1:23 pm ] |
| Post subject: | Re: Sierra Brake upgrade & rear disc conversion |
Daz7 wrote: Question - do all lwb Vitaras have the same front discs and calipers? Looking at ordering a set but want to know I'm getting the right ones for the conversion. ALL 1.6L LWB vitaras have a vented rotor and caliper to suit. AFAIK, all 1.6 LWB's run the same brakes. 2.0L SWB and LWB are different again, so you'll want 89-95 LWB 1.6 vitara brakes. |
|
| Page 1 of 3 | All times are UTC + 9:30 hours |
| Powered by phpBB® Forum Software © phpBB Group https://www.phpbb.com/ |
|